ADVANCED AIRWAY |
||||||||||||||||||||||||||||||||||||||||||||||||
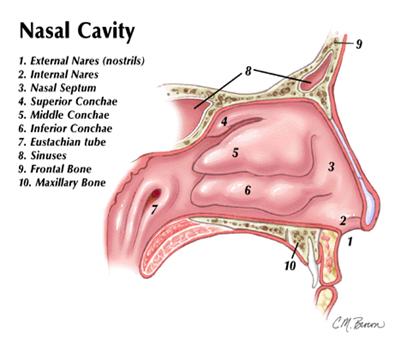
INTRODUCTIONOxygen is an essential component in our bodies. Inadequate perfusion can have irreversible effects such as organ failure, loss of brain function, and death. In any patient-care situation, you must first evaluate, establish, and maintain a patent airway. Afterwards, you must determine whether or not the patient is breathing adequately and be prepared to ventilate if necessary. Remember that oxygen is one of the most important drugs at your disposal. Your proficiency in these skills can make the difference in your patient's well-being. ANATOMY OF THE RESPIRATORY SYSTEM The structural components of the respiratory system are divided into the upper and lower airway with the glottic opening (vocal cords) being the midpoint. UPPER AIRWAYThe structures in the upper airway are further divided into the nasal cavity, oral cavity, pharynx, and the larynx. NASAL CAVITY
When we inhale, air passes through our nostrils (external nares) through the internal nares and into the right and left nasal cavities. These nasal cavities are lined with mucous membrane and cilia and are separated a bony partition called the nasal septum. The air then strikes three bony projections termed superior, middle, and inferior conchae or turbinates which are also lined with mucous. In turn, these turbinates cause air turbulence which aid in filtering, warming, and humidifying the air before exiting through the internal nares and into the rest of the respiratory system. The nasal cavity is also connected by the eustachian tubes into the middle ear. The sinuses are cavities in the frontal and maxillary bones of the skull. In addition to producing mucus, they serve as resonating chambers for sound when we speak or sing. Bacteria can become trapped in the sinuses and they commonly become infected.
ORAL CAVITYThe oral cavity is commonly called the mouth. It contains structures such as teeth and gums while bordered by cheeks, tongue, and the hard and soft palates. The tongue is attached to the mandible and hyoid bone by muscles and ligaments. The hyoid bone is the only bone in the axial skeleton that does not articulate with any other bone. It is merely suspended by the ligaments from the styloid process located on the temporal bone.
PHARYNXThe pharynx extends from the back of the soft palate to the esophagus. The pharynx permits the flow of air to the trachea (windpipe) as well as food and liquids to enter into the digestive tract.
LARYNXThe larynx is composed of six paired and three unpaired cartilages connected to each other by muscles and ligaments. The thyroid cartilage (Adam's apple or laryngeal prominence) is the largest, yet the narrowest opening in adults, and most superior of the unpaired cartilages. The most inferior cartilage is the cricoid cartilage. It is the only complete cartilage ring in the larynx and is the smallest opening in children. The cricothyroid membrane is the site for surgical airway insertion. The third unpaired cartilage is the epiglottis. The vocal cords are also known as the glottic opening and separate the upper airway from the lower airway.
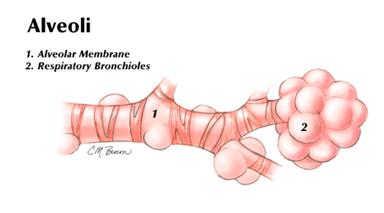
LOWER AIRWAYBelow the glottic opening are the lower airway structures. The lower airway contains the trachea, lungs including bronchi, alveoli, lung parenchyma, and pleura.
|


|
GAS |
CONCENTRATION |
PARTIAL PRESSURE |
|
NITROGEN |
760 X 0.7862 |
597.0 mmHg |
|
OXYGEN |
760 X 0.2084 |
159.0 mmHg |
|
CARBON DIOXIDE |
760 X 0.0004 |
0.3 mmHg |
|
WATER |
760 X 0.0050 |
3.7 mmHg |
|
TOTAL |
760 X 1.00 |
760 mmHg( 1 Torr ) |
Likewise, the quantity of O2 and CO2 in the blood can be measured in the same manner since the alveolar and arterial partial pressures are about the same:
|
GAS |
CONCENTRATION |
PARTIAL PRESSURE |
|
NITROGEN |
760 X 0.749 |
569.0 mmHg |
|
OXYGEN |
760 X 0.137 |
104.0 mmHg |
|
CARBON DIOXIDE |
760 X 0.052 |
40.0 mmHg |
|
WATER |
760 X 0.062 |
47.0 mmHg |
|
TOTAL |
760 X 1.00 |
760 mmHg ( 1 Torr ) |
Therefore, the partial pressure of O2 (PO2) in the arteries and alveoli is approximately 100 Torr (Average is 80 - 100) and the PCO2 is 40 Torr (Average 35 - 40 ).
DIFFUSION
Gas molecules are in a constant state of random motion constantly colliding with one another. In fact, the volume of gas depends on the volume of the container that it is in. Suppose a semipermeable membrane were to be linked in this gas container connected to another container which is empty. The gas in the first container has a higher partial pressure than that of the second container and would cross the membrane until the two containers are in equilibrium (partial pressures of both containers equal each other). This principle is called diffusion. Diffusion occurs in the respiratory system between the lungs and the blood and also between the blood and the peripheral tissues. The rate of diffusion depends upon its solubility in liquid. The number of gas molecules dissolved in the liquid is directly proportional to the pressure of the gas. CO2 is 21 times more soluble in water than O2, thus readily crosses the pulmonary capillary membrane to the alveoli (which has a lower PCO2). The PO2 in the alveoli is much greater than the PO2 in the capillaries; therefore, the O2 in the alveoli wants to diffuse across the capillary membrane. This results in an exchange of both O2 and CO2 between the capillary membrane thereby providing O2 to the body and eliminating CO2 waste.
BLOOD OXYGEN CONCENTRATION
Each liter of arterial blood contains the same amount of oxygen molecules as 200 mL of pure oxygen gas. As previously mentioned, oxygen is transported throughout the body from the lungs by hemoglobin. Hemoglobin is a respiratory protein found exclusively in red blood cells. On this protein are four iron atoms to which the oxygen binds. The most important factor regarding hemoglobin saturation is the PO2 of the blood. Other factors are blood pH and temperature.
Hemoglobin nears 100% saturation when the PO2 reaches 50 - 100 Torr. About 97% of oxygen is transported on the hemoglobin protein. The other 3% is dissolved in plasma. Because PO2 measurements identify only amounts of dissolved oxygen in the plasma, they may not always reflect the total oxygen saturation. Such as the case with carbon monoxide (CO) poisonings. CO has a higher affinity for oxygen-binding hemoglobin sites than O2. With CO bound to the hemoglobin, O2 cannot bind. However, the arterial blood gas sample may reveal a falsely higher value of PO2. In this case, an arterial carbon monoxide test can be performed.
There are many factors that can cause inadequate oxygen perfusion. One such factor is pulmonary edema. Pulmonary edema results in when fluid fills the space between the alveolar membrane and the pulmonary membrane. Other factors affecting blood oxygen concentrations are limited inspired oxygen concentration, respiratory muscle paralysis, pneumothorax, and COPD conditions such as emphysema, bronchitis, and asthma. In atelectasis, a portion of the alveoli collapses, thus, blood goes past them without being oxygenated or removal of carbon dioxide. One more important factor needing mention is a blood clot or gas bubble termed pulmonary embolism which can impede or halt blood flow.
CARBON DIOXIDE IN THE BLOOD
Carbon dioxide is continuously produced in the body. The amount produced is relative to several factors. For instance, exercise or muscle exertion causes increased production. Even subtle actions such as fever, shivering, or metabolic processes such as ketoacidosis from the deficiency of insulin will raise the amount of carbon dioxide in the body. Conversely, carbon dioxide can be present in high amounts due to poor elimination. This can result from airway obstruction, drug use, respiratory muscle impairment, or diseases such as asthma and emphysema.
Carbon dioxide is moved throughout the body in the blood. It is transported in the forms of plasma (8%), blood proteins, including hemoglobin (20%), and as bicarbonate ions (72%). Oxygen-bound hemoglobin in arterial blood flows through tissue capillaries. The oxyhemoglobin releases the oxygen into the tissues and the carbon dioxide diffuses from the tissues into the blood, thus resulting in a small percentage of carbon dioxide in the plasma.
Just as carbon monoxide has a higher affinity for hemoglobin than oxygen, carbon dioxide, has a higher affinity than oxygen to bind with hemoglobin. The approximately 20% of carbon dioxide that is diffused into the red blood cells binds with the hemoglobin to form carbaminohemoglobin. The leftover carbon dioxide (72%) reacts with water to form carbonic acid which then breaks down into hydrogen and bicarbonate ions. The ratio of carbonic acid (H2CO3) to bicarbonate (HCO3-) is 1:20. The following chemical equation shows the movement of this reaction:
CO2 + H2O <---> H2CO3 <---> H+ + HCO3-
Whether the direction of this reaction moves in the direction of the right or left depends upon what the body is trying to accomplish. For example, inadequate ventilation causes a buildup of carbon dioxide thus adding CO2 to the left side of the equation. This would cause the reaction to move to the right in order to keep the equation (body) in equilibrium. On the other hand, if the system has a surplus of hydrogen ions causing acidosis, the reaction would be driven to the left to maintain equilibrium.
REGULATION OF RESPIRATION
NERVOUS CONTROL OF RESPIRATION
In the brainstem lies the medulla which is the main respiratory center. Nerve cells called neurons (acetylcholine) fire impulses in bursts down the spine to initiate respiration. Once inspiration is initiated, stretch receptors in the smooth muscle of the lungs become activated. This is called the Hering-Breuer reflex. Nerve fibers from here travel via the vagus nerve back to the medulla and inhibit the inspiratory neurons to help terminate inspiration. Another mechanism responsible for respiration is the apneustic center located in the lower area of the pons. This center initiates respiration when the medulla fails to do so. Also located in the pons is the pneumotaxic center. This center differs from the others by controlling expiration. Expiration, as we have already discussed, is a passive process. However, only during labored breathing does the pneumotaxic center appear to be active.
CHEMICAL CONTROL OF RESPIRATION
Respiration is also controlled chemically. In the medulla are chemoreceptors that sense changes in the pH and PCO2 in the body. If the PCO2 increases, the pH will fall forcing the respiratory centers to increase ventilations. Conversely, if the PCO2 decreases, then the body corrects this by slowing down respirations. By utilizing these measures, the body can maintain normal PCO2 levels of 35 to 45 mmHg. The body monitors the PO2 as well. PO2 chemoreceptors are located in the medulla, in the bifurcation of the common carotid arteries, and in the aortic arch. Significant hypoxemia stimulates respiration. Individuals with respiratory diseases such as emphysema and chronic bronchitis often retain CO2 thus having a constantly elevated PCO2. Eventually, the chemoreceptors become accustomed to this level and the central nervous system stops regulating respirations this way. These people must then rely on their body sensing changes in PO2 to control respiration. This process is termed hypoxic drive. The administering of high flow oxygen to these individuals can, in theory, be detrimental. Since the increased oxygen can double or triple the PO2 levels, the chemoreceptors in the carotid arteries and the aorta stop the stimulation of the respiratory centers causing apnea.
This presupposes that the body cannot voluntarily control its own respiratory drive. Think about it. At any time, you can tell yourself to take a breath. So can the patient. With your help, they can be reminded to breathe if necessary. It is important to understand the physiology at work here. Many of these patients are already hypoxic. If you stick to the strict rule of only administering low levels of supplemental oxygen, they will likely continue to remain hypoxic. Obviously, the EMT should exercise caution and good judgement when treating these patients. The most important lesson to take away from here is:
NEVER WITHHOLD OXYGEN FROM A PATIENT WHO NEEDS IT!!!!!
If they do quit breathing, BAG THEM!!!!!
OTHER RESPIRATORY FACTORS
There are several other factors, as mentioned earlier, that contribute to respiration rates. Those that increase ventilations are physical activity, fever, pain, emotion, and certain medications. Those that decrease these rates are sleep, depressant drugs, and hypothermia.
FORMS OF RESPIRATION
There are several types of respirations. The cough and the sneeze reflex are a protective measure the body uses to expel foreign objects or irritants from the airway. The body prepares for the cough or sneeze by inhaling a larger volume of air than normal. The glottis closes and the thoracic muscles contract causing an increase in intrapulmonic pressure of about 100 mm Hg. The vocal cords then open. In coughing, the air forcibly exits carrying the foreign matter or irritants with it. In sneezing, the air is forced through the nasal cavity. During the sneeze, the uvula and soft palate depress causing the air to exit through both the nasal and oral cavity. Another protective measure is the gag reflex which helps prevent foreign material from entering the airway.
There are several abnormal breathing patterns which have different underlying causes. Abnormal breathing patterns include:
Biot's |
Ø rapid, short breathing with pauses of several seconds |
|
Bradypnea |
Ø abnormally slow respiratory rate |
|
Cheyne-Stokes |
Ø progressive increase in the rate and volume of respirations that later gradually subsides with periods of apnea |
|
Hyperventilation |
Ø abnormally rapid respiratory rate |
|
Kussmaul's |
Ø abnormally rapid, deep respiratory rate |
|
Tachypnea |
Ø abnormally rapid and shallow respirations |
Sighing and hiccoughing are also included in forms of respiration. Sighing is the slow, deep inspiration, which hyperinflates the lungs, followed by a prolonged exhalation. Hiccoughing is a sudden inspiration due to a spasmodic contraction of the diaphragm. This will usually pass in time.
Another type of respiration is grunting. Grunting usually occurs in neonates. The air is expired against a partially closed epiglottis. Often it is indicative of respiratory distress.
RESPIRATORY ASSESSMENT
It is extremely important to determine the immediate threats to the patient. Quickly assess the airway and prepare to intervene with appropriate steps (initial assessment). When possible, complete with a focused physical exam to determine the underlying cause of the respiratory emergency.
INITIAL ASSESSMENT
Identify any immediate threats to the patient's life by performing an initial assessment. Normal respiration should be effortless and steady. The resting adult rate should be 12 - 24 breaths per minute. The resting respiratory rate in children depends on the age of the child, the younger the child, the faster the rate.
What is your general impression of the patient's problem? Use the AVPU scale to determine mental status. Check the airway for patency. Assess the quality of perfusion. Is the capillary refill within 2 seconds or are the lips cyanotic? If the patient is not breathing, use the head-tilt/chin-lift maneuver or, if trauma is suspected, use the jaw-thrust maneuver and care for possible c-spine injury. If breathing is still absent or inadequate, artificially ventilate using O2, if possible, and consider airway adjuncts.
FOCUSED PHYSICAL EXAM
The focused physical exam is to determine the possible underlying cause of the nature of the injury or illness. You should be able to recognize signs of respiratory distress: sitting upright, use of accessory muscles, nasal flaring, pursed lips, and cyanotic or ashen skin color. Obtain a SAMPLE (signs and symptoms, alleries, medications, past medical history, last oral intake, and events leading up to the incident) history and ask about what triggers the problem (such as cold air or allergens), the duration of the problem, and what makes the symptoms worse or better. Ask about associated symptoms such as chest pain or fever.
For trauma, perform a rapid head-to-toe exam. Check for jugular vein distention and tracheal deviation. Note the chest movement and quality of breath sounds. Is there good air exchange, clear and equal breath sounds or is there the presence of snoring or gurgling that may indicate a partial airway obstruction? Does the chest rise and fall equally or is there, perhaps, paradoxical movement suggesting a flail chest segment? Remember to always reassess your patient at least every 3 - 5 minutes.
Perfusion can be further checked by a pulse oximeter which is a device used to measure oxygen saturation in peripheral tissues. The normal range is between 95 - 99%. False results can occur in situations of CO poisoning, hemoglobin abnormalities, and high intensity lighting as well as any time circulation of the site, to which the probe is applied, is impaired. Use caution in these situations. Remember, treat your patient and not the machine!
After intubation, end-tidal carbon dioxide (ETCO2) detectors can be used to measure the carbon dioxide in exhaled air. This is extremely useful for the determination of proper placement of the endotracheal tube. These come in the form of electronic devices or colorimetric paper that changes color (usually from purple to yellow) when it reacts with carbon dioxide.
AIRWAY OBSTRUCTION
When the airway is obstructed, you have an immediate life-threatening situation on your hands. The obstruction can be a tongue, vomitus, food, toy, teeth, etc. The airway can be partially blocked or completely blocked. With adequate air exchange, a person should be able to generate a cough in order to remove the obstruction. If a patient cannot generate a cough, then they are suffering poor air exchange. They may have high-pitched noises when inspiring, increased breathing difficulty, and/or cyanosis. With a complete airway block, the patient will rapidly become unresponsive and die in a matter of minutes if there is no successful intervention.
TRAUMA
Many times you will come across a patient with some type of airway trauma. With such a situation, loose teeth, clotted blood, broken facial bones, etc. can cause airway obstruction. Large amounts of blood may enter the lungs and plug up the smaller airways preventing oxygenation from occurring. Also, in blunt trauma, the larynx may be displaced or fractured allowing the vocal cords to collapse into the tracheal lumen. Additionally, trauma to the neck and head can produce life threatening results. The respiratory centers are locates in the base of the brain (medulla) and the pons. With trauma comes swelling. The brain with intracranial swelling has a limited area in which to go. With increased swelling, the brain begins to push down the base of the skull thus preventing the respiratory centers from functioning.
LARYNGEAL SPASM
In the adult, the glottis is the narrowest part of the airway. Because of this, when the vocal cords spasm or become edematous, the patient is now in a true life-threatening emergency. The airway becomes closed off to air flow resulting in asphyxia. Additionally, under the vocal cords are tissues where body fluids can accumulate or swell after trauma. The fluid build up diminishes slowly making this also troublesome and needing aggressive care. The causes of laryngeal spasm are from anaphylaxis, epiglottitis, croup, and inhalation of superheated air, smoke and others. Over a period of time, the heated gases from a fire can cause swelling. Initial soreness can quickly deteriorate into complete airway obstruction. Also, allergic reactions can occlude the airway.
BASIC AIRWAY MANAGEMENT
After your patient assessment, you must decide and correct for a patent airway. Initially, you can use manual airway techniques, proceeding to basic mechanical airway adjuncts, then later, if necessary, more advanced procedures can be utilized.
MANUAL AIRWAY
There are two widely used manual airway techniques which can be very effective in ensuring a patent airway. These are the head-tilt/chin lift maneuver, used when no trauma is suspected, and the jaw thrust, used in trauma situations or when there is suspected cervical spine compromise.
HEAD-TILT/CHIN-LIFT
1. Place the patient on their back (supine position). Position yourself by their side.
2. Place your hand on the patient's forehead tilting the head back by applying firm, downward pressure with the palm of your hand.
3. With your other hand, grasp the chin (thumb on the anterior mandible and index finger on the inferior mandible) and lift the jaw anteriorly to open the airway. Try to avoid applying excessive pressure on the jaw.
JAW-THRUST MANEUVER
1. Again, with the patient supine, kneel at the top of their head.
2. Place the fingertips of each hand on the angles of the patient's lower jaw.
3. Gently, anchor your thumbs at the temples of the patient.
4. Forcefully displace the jaw forward, while firmly supporting the head being careful not to tilt the patient's head backward.
5. Apply a C-collar yet continue to maintain c-spine until the patient is completely immobilized.
SELLICK'S MANEUVER
Often during assisted ventilation and intubations, gastric regurgitation occurs further complicating your airway interventions and the airway patency. The Sellick's maneuver is handy in preventing this from happening. Apply slight pressure using the thumb and index finger to the lateral and anterior aspects of the cricoid cartilage. The cricoid cartilage is the prominence just below the thyroid cartilage (Adam's apple). This temporarily closes off the esophagus (which lies behind the cricoid cartilage) from excess air, and with greater pressure, prevents vomitus from exiting.
OROPHARYNGEAL AIRWAYS
Because the tongue is the major cause of obstruction, oropharyngeal and nasopharyngeal airways were developed to lift the base of the tongue off of the posterior oropharynx. An oropharyngeal airway is composed of plastic or rubber and is semicircular. It is measured from the patient's earlobe to the corner of the mouth. The correct size is important. It is not to be used in conscious or semiconscious patients with a gag reflex. This may stimulate vomiting. After insertion, if patient exhibits a gag reflex, remove the adjunct immediately. Place the adjunct in the patient's mouth as follows:
· Hyperextend the patient's neck if no trauma is suspected.
· If possible, have your partner ventilate the patient until inserting.
· With your thumb and index finger, grasp the patient's tongue and jaw, lifting anteriorly.
· With your other hand, hold the proximal end of the adjunct and insert it with the curve in the opposite direction than that of the natural curve of the mouth. The tip should be pointing toward the roof of the mouth.
· Once the tip of the adjunct is at the level of the uvula, turn the adjunct 180· until it rests on the tongue.
· Verify placement by breath sounds and chest rise.
· Continue O2 support.
Indications
· Keeps tongue in a position for air to move through the device.
· Prevents obstruction of teeth and lips.
· Helps manage unconscious patients breathing spontaneously or in need of mechanical ventilation.
· Pharynx can be suctioned easier.
· Can be an effective bite block during seizures or intubations.
Contraindications
· It does not isolate the trachea.
· It cannot be inserted with clenched teeth.
· If not inserted properly, can obstruct the airway.
· May be dislodged easily.
NASOPHARYNGEAL AIRWAY
The nasopharyngeal airway is used to maintain an airway on a patient which is conscious or unconscious and possessing a gag reflex. The nasal tube is soft, pliable, and gently curved. The length of the tube is measured from the ear lobe to the tip of the patient's nose. The nasal tube should be lubricated before insertion. Use the head-tilt/chin-lift or jaw thrust maneuvers to aid in insertion. Place the tube in the nostril with the beveled tip pointing toward the nasal septum. Gently pass the nasal tube along the floor of the nostril. The tube should follow the natural curvature of the nasal cavity. Do not force the airway. If resistance is met, rotate the tube to try to continue. If not, try the other nostril. You probably will encounter some minor bleeding with this procedure since the nasal cavity is quite vascular and sensitive. If the patient starts to gag, pull back on the tube about 0.5 to 1 cm and try again. The tube may be stimulating the posterior pharynx.
Advantages
· Well tolerated by semiconscious patients with a gag reflex.
· Rapid insertion.
· May be used when OPA is contraindicated.
· May be used with trauma to the mouth.
Contraindications and Complications
· Do not use when basal skull or nasal bone fractures are suspected.
· May generate vomiting in patients with a gag reflex.
· May initiate laryngeal spasm.
· May injure nasal mucosa causing bleeding and airway obstruction.
· It is difficult to suction through.
· It does not protect the lower airway from aspirations.
SUCTIONING
The goal of suctioning is to remove vomitus, saliva, and foreign bodies that may block the airway. Many of these machines are portable. There are two kinds of suction tips that can be used. The whistle-tip catheter is a narrow, flexible tube used in tracheobronchial suctioning through an ET tube or the nasopharynx. The proximal end of the catheter has an opening which your thumb covers to generate the suction. Suctioning should not be attempted until the patient has received at least 2 minutes of 100% oxygen. To initiate suctioning, place the end of the catheter in the appropriate location, occlude the port, and begin suctioning in a circular motion while exiting the area.
The tonsil-tip suction catheter is made of a hard plastic and is used to clear larger secretions and objects from the oral cavity. When the power is turned on, the catheter immediately provides suction. Therefore, after oxygenating the patient, place the catheter in the mouth, turn on the power, and with a circular motion, begin to withdraw the catheter. For both types of catheters, suction no more than 10 seconds. If additional suctioning is needed, oxygenate the patient first, then repeat suctioning to avoid hypoxia.
OXYGEN ADMINISTRATION
Oxygen comes supplied in compressed gas cylinders and as liquid oxygen. Some commonly used compressed gas cylinders in the field are D, E, and M cylinders and are made of steel or aluminum. Liquid oxygen is oxygen that has been cooled to its aqueous state and converts to a gas when at room temperature. The advantage of liquid oxygen is that it requires less room for storage, but the storage unit must be kept upright.
There are numerous oxygen delivery systems which can aid in providing supplemental oxygen to patients. Frequently used are the nasal cannula, nonrebreather mask, and the Venturi mask. Recently, the Department of Transportation recommends the use of the nonrebreather mask in the prehospital setting unless the patient cannot tolerate this device, in which case, the nasal cannula should be used.
NASAL CANNULA
The nasal cannula delivers low concentrations of oxygen to the patient. It is a plastic tube with a couple of prongs extending from the middle to be placed in the patient's nostrils. The flow rate for the nasal cannula should be 1 to 6 Liters/minute delivering 24 to 44% oxygen. It has been mentioned that delivering more than 35% oxygen is difficult with this device due to mouth breathing associated with O2 administration. The nasal cannula should be used on patients with chest pain or COPD patients. The nasal cannula is ineffective in patients whose nasal passages are occluded with mucous or blood.
SIMPLE FACE MASK
The simple face mask is a clear plastic mask that conforms to patient's face. Located on both sides of the mask are small openings allowing atmospheric air to mix with the oxygen being delivered. These perforations also allow the patient's exhaled air to vent. The oxygen concentration that can be delivered is 35 to 60%. The flow rate should be set in the range of 6 to 8 L/min. If administering less than 6 L/minute, the patient could be at risk for development of hypoxia due to the excess accumulation of carbon dioxide within the mask itself.
NON-REBREATHER MASK
The non-rebreather mask is similar to the simple face mask. However, attached to the mask is a plastic reservoir which fills with oxygen. It has a valve on the face mask that prevents exhaled air from returning to the reservoir. The flow rate should be from 10 to 15 L/minute and delivers concentrations of 80 to 95% O2. The reservoir bag should be inflated with oxygen prior to placement on the patient.
VENTURI MASK
The Venturi mask is an oxygen delivery device which delivers O2 in the 24 to 50% range. It can deliver a precise fraction of inspired oxygen (FiO2) at low concentrations. In order to achieve this precise mixture, the Venturi mask mixes gas from the atmosphere with oxygen. The mask has various color-coded adapters which control the oxygen control rate. In the past, this mask was the recommended device to be used in patients suffering from COPD. Check with your local protocols regarding the use of any of these devices.
HUMIDIFIERS
Unhumidified oxygen can be irritating to the mucous membranes of the airway. Humidified oxygen should be used for patients suffering from asthma, croup, epiglottitis, and smoke inhalation. Humidifiers are attached to the flow meter or regulator device and should be disposed of after each patient use.
VENTILATION
There are various methods of providing patient ventilatory support in the prehospital setting. These include mouth-to-mouth, mouth-to nose, mouth-to-stoma, mouth-to-mask, bag valve masks (BVM), and the demand valve resuscitator. Remember to always use some type of barrier device when appropriate.
MOUTH-TO-MOUTH/MOUTH-TO-NOSE
These techniques can provide efficient ventilatory support to a patient without requiring any special equipment. When we exhale, the amount of O2 expired is about 15 to 17%. Our bodies utilize roughly 5 to 6% O2 which can easily be delivered by these techniques. The major limitations are the ability for the rescuer to deliver the needed volume of air and to maintain an adequate face seal. Rescue breathing should be performed at a rate of 12 breaths/minute. Be prepared for regurgitation from the patient.
Open the airway by either the jaw-thrust or head-tilt/chin-lift technique. In mouth-to-mouth, pinch the patient's nose closed; in mouth-to-nose, cover the mouth to form a seal. Take a deep breath and seal your mouth over the opening (mouth or nose) you wish to deliver the breath. Exhale into the patient until you see the patient's chest rise. Break contact with the patient to allow for passive exhalation. Turn your head to the side facing the patient to avoid vomit and exhaled air while watching for the rise and fall of the chest. Repeat this process until the patient breathes on their own or until CPR should be started.
In infant patients (0 to 12 months), place your mouth over both their nose and mouth to form a seal. Use just enough pressure to make the chest rise and fall. This amount is less than an adult. Provide ventilations at a rate of 1 breath every 3 seconds.
MOUTH-TO-STOMA
A stoma is a surgical opening at the neck of a patient who has had a laryngectomy or a tracheostomy. Because of this, the larynx is no longer connected to the trachea. Clean the stoma and suction if necessary. Keep the patient's head straight versus hyperextended. Administer breaths. If air is escaping through the patient's nose or mouth, pinch off the nose and form a seal of the mouth with your hand. The rate is the same (12 breaths/minute) as mouth-to-mouth.
MOUTH-TO-MASK
Mouth-to-mask or barrier device is the preferred method over the mouth-to-mouth technique due to the possibility of disease transmission from patient secretions and regurgitation. There are many different, yet effective, types of barrier devices on the market. You are urged to use one if at all possible.
Open the patient's airway by either the head-tilt/chin-lift or the jaw-thrust maneuver. Place the barrier device over the patient's mouth. If the device makes a seal over the nose and mouth, begin rescue breathing. If the device you are using only covers the mouth, pinch off the nose while rescue breathing. Some of these barrier devices have an oxygen port. If possible, attach oxygen tubing to this and deliver oxygen at a rate of 10 to 15 L/min along with rescuer ventilations. Please note that this method of ventilation actually delivers the greatest tidal volume of air to the patient (1500 to 2000 ml compared to 1000 to 1200 ml by BVM.)
BAG VALVE MASKS
The bag valve mask is an oblong, self-inflating rubber or plastic bag which is attached to a nonrebreathing valve. It has a port at the back of the bag to connect oxygen tubing to and can attach to a mask, ET tube, or other airway adjunct. It should be able to perform in all kinds of environmental conditions and temperatures. There are different sizes available for neonatal, pediatric, and adult patients. When attached to 15 L/min O2, the BVM can deliver from 90 to 95% O2. Without supplemental O2, the BVM can deliver 21% atmospheric O2). When there is no reservoir but the bag is connected to supplemental oxygen, the patient will receive roughly 60% O 2. The most difficult problem with this device is maintaining an effective face seal. The use of two persons, proper postitioning, and experience can overcome this problem. Other problems with the bag valve mask device is that it is difficult to perform ventilations with cervical spine stabilization devices in place and it is difficult to deliver an adequate tidal volume of air.
Place yourself at the top of the patient's head. Position the patient's airway by either the head-tilt/chin-lift or the jaw-thrust maneuver. If needed, clear the airway of secretions, etc. If the patient is unconscious and has no gag reflex, insert an OPA. Place the BVM mask over the patient's nose and mouth. Firmly hold the mask on the face to maintain an effective seal. Compress the bag with the aid of a part of your body (your thigh if kneeling by the patient), your hand if you have large enough hands), or have a second rescuer help. The bag should be compressed every 3 to 5 seconds (adult) or every 3 seconds (infant). Be sure to use slow, full inflations since quick, forceful pressures tend to be directed into the gastric areas.
DEMAND VALVE RESUSCITATOR
These oxygen-powered, manually triggered devices will deliver 100% O2 to a patient at its highest flow rates. They are composed of high-pressure tubing connecting to an oxygen supply of 50 psi., a valve that can be activated by a push button or lever, and can connect to a mask, ET tube, EOA, or tracheostomy tube. When using this device, watch for adequate rise and fall in the patient's chest.
Because of the high inspiratory flow rates, gastric distention is common leading to regurgitation, thus further complicating the situation. Most units have an alarm that will sound when the inspiratory pressure reaches 60 to 80 cm of water. When this happens, gas flow from the units ceases, preventing possible overinflation of the lungs. A disadvantage of the demand valve is that the rescuer is unable to feel compliance of the lungs while ventilating. These devices should not be used in pediatric patients.
These devices can actually be used by a conscious, breathing patient, as in a smoke inhalation patient that can hold the mask to his/her face. The device provides 100% O2 and is sometimes more acceptable than having an O2 mask placed on them.
AUTOMATIC VENTILATORS
There are several compact mechanical ventilators available for use in the prehospital setting. These ventilators are lightweight and are superior to BVM devices in that they can maintain minute volume. During cardiac arrest situations, they can provide mechanical breaths while the rescuer can administer chest compressions. Many of these ventilators have a "pop-off" valve which can prevent pressure related injuries. Once again, the rescuer is unable to feel lung compliance while ventilating.
The automatic ventilator has two controls which regulate the tidal volume and the ventilatory rate. It also comes with an adapter which can attach to various airway adjuncts. This can aid the paramedic by providing ventilations after an intubation so that other needed treatments can be performed.
ADVANCED AIRWAY MANAGEMENT
INTUBATION
Often more aggressive maneuvers are needed to help the patient maintain an effective airway. The preferred method of advanced airway management is endotracheal intubation. Intubation is the process of passing a tube into a body opening, in this case, to isolate the trachea. There are numerous devices in which to do this. Other devices include pharyngeo-tracheal lumen airway, esophageal tracheal combitube, Esophageal obturator airway, and nasotracheal intubation.
ENDOTRACHEAL INTUBATION
The endotracheal tube (ET tube) is a somewhat flexible tube which is inserted into the patient's trachea. The tube has a cuff which inflated to isolate the trachea and the distal end of the tube has a 15 mm adapter that attaches to various oxygen-delivery devices. The ET tube comes in various sizes. The average size used in adult females range from 7.5 to 8.0 i.d. (internal diameter) Adult males range from 8.0 to 8.5 i.d. There are also infant and child ET tubes in varying sizes. Uncuffed devices are recommended for children under the age of 8 years. According to the American Heart Association, children 8 years and over should be sized with an ET tube equal to the diameter of their little finger. There are other methods for ET tube sizing available. Remember, it is the patient's size that determines the proper ET tube, not their age.
EQUIPMENT FOR INTUBATION
To perform an endotracheal intubation, certain pieces of equipment are needed. First, a laryngoscope is required to visualize the glottis. Laryngoscopes have a stainless steel handle containing batteries for the light source. Attached to this is a blade made of stainless steel with a light source (fiber optic blades have the bulb in the handle) placed at the distal end of the blade. The laryngoscope is turned on when the connection is made by fully opening the blade to form a right angle between the blade and the handle.
There are two types of blades (in various sizes) used. Miller, Wisconsin, or Flagg blades are straight. The tip of these blades is applied directly on the epiglottis to visualize the vocal cords. The curved blade is called MacIntosh and fits into the vallecula to lift the epiglottis without touching it. Either blade can be used and the choice is a matter of personal preference. It is advised, however, to be proficient with both in case your preferred type of blade is not available.
When the ET tube is being inserted, it should be lubricated beforehand. A malleable stylet may be used to shape the ET tube to facilitate proper placement of the tube. The stylet must be lubricated also, for easier removal. Additionally, it must be at least 1 - 2 cm back from the distal end of the tube. If not, damage to the vocal cords may occur. Other items needed are a stethoscope, BVM, syringe, oral airway or bite block, tape or other securing device, and suction equipment.
Before insertion, all equipment must be examined for defects. This requires cuff inflation of the ET tube with ~8 mL of air and evaluating the bulb on the laryngoscope for brightness, as well as its secureness in the socket.
Patients in which no cervical spine injury is suspected should be placed in the "sniffing" position (hyperextended). Position yourself at the patient's head. Check the oral cavity for foreign objects and secretions, suctioning if necessary. Open the patient's mouth with your right hand. Grasp the lower jaw with your right hand pulling it upward. If the patient has loose dentures, remove them. Hyperventilate the patient for 2 minutes. With the opened laryngoscope in your left hand, place the blade in the right side of the mouth, moving the tongue to the left. Place the curved blade into the vallecula and lift. If using a straight blade, place it on the epiglottis and lift. Both of these will expose the vocal cords. When lifting, be sure not to use the teeth as a fulcrum. Insert the ET tube into the right side of the mouth and advance it through the vocal cords so that the cuff is past the cords 1 to 2.5 cm. If using a stylet, remove it at this time. Take no more than 30 seconds per attempt, hyperventilating in between. Inflate the cuff with ~ 8mL air. Attach the tube to a BVM and begin to ventilate. Auscultate to ensure proper placement. If breath sounds are diminished or absent on the left side, you may have inserted the tube too far. Deflate the cuff and pull it back a little. Inflate it and determine placement again. Insert an OPA as a bite block. Secure the tube and note its position in the mouth (to ensure no shifting).
Advantages
· Isolates the trachea.
· Prevents gastric distention.
· Easy suctioning.
· Permits the administration of medications.
Disadvantages
· Need specialized equipment.
· Your face must get close to the patient in order to visualize the vocal cords.
· If in the wrong position, it will not allow ventilation of the lungs.
· It can cause damage to the vocal cords.
PHARYNGEAL TRACHEAL LUMEN AIRWAY
The pharyngeal tracheal lumen (PtL) airway and the esophageal tracheal combitube have two tubes separated by a partition wall. One tube is short and wide with a balloon that inflates to seal the oropharynx. The other tube travels through the first one extending 10 cm beyond it. This second tube can be placed into the trachea or the esophagus. When its distal cuff is inflated, it occludes whichever passage it is inserted into.
Advantages
· No direct visualization of the larynx.
· Needs no face mask seal.
· Does not require movement of the head or neck; useful in trauma patients.
· Protects the trachea from secretions.
Disadvantages
· The oropharyngeal balloon can move out of place, dislodging the airway.
· This procedure is difficult.
· Cannot be used in patients with a gag reflex.
ESOPHAGEAL OBTURATOR AIRWAY
The esophageal obtuator airway (EOA) is a large, flexible tube with a distal cuff which occludes the esophagus on one end and attaches to a mask on the other. This mask then attaches to a BVM. The tube is approximately 37 cm long. This device is inserted into the esophagus and, once the cuff is inflated, keeps air from entering the stomach and gastric contents from entering the trachea. There are 16 holes in the upper part of the EOA and, with a proper mask seal, forces air into the trachea. This apparatus will stimulate a gag response. Therefore, it should only be used in patients who are unconscious. If a patient becomes responsive, remove the EOA quickly and be prepared for vomiting.
The patient's head and neck should be in a neutral or slightly hypoextended position. Check your equipment and make sure the cuff does not leak. Lubricate the distal end of the device. Hyperventilate the patient for 2 minutes. A tongue-jaw lift should be performed with one hand while inserting the EOA with the other. Hold the middle to upper third of the tube like a pencil. Insert the tube gently down the passageway. If resistance is met, withdraw the EOA a little, improve the jaw-lift, and try again. Fill the cuff with air (amount is patient dependent). Attach a BVM to the mask, form a tight seal around the face, and begin oxygen delivery. Check placement by auscultation.
Advantages
· Easily inserted without visualization of the larynx.
· Prevents gastric distention and regurgitation.
· It may be used on trauma patients (no hyperextention of the neck).
Disadvantages
· Difficult to maintain an adequate mask seal.
· Will sometimes cause esophageal trauma.
· It may enter the trachea and occlude the airway.
Contraindications
· Persons under 16 years of age.
· Persons under 5 feet or over 6’'7" tall.
· Persons who have ingested caustic poisons.
· Persons having a history of esophageal disease or alcoholism.
NASOTRACHEAL INTUBATION
There are some instances when oral intubations should not be performed. Nasotracheal intubation may be your only recourse in certain situations:
· Patients with spinal injuries.
· Patients who are not comatose or in arrest.
· Patients whose mouth cannot be opened such as clenched teeth or fractured jaw.
· Patients with oral or maxilofacial injuries or have recently undergone oral surgery.
· Severely obese patients.
Hyperventilate the patient for 2 minutes. Assemble and check your equipment. Lubricate the distal end of the tube. Lidocaine spray at this point will also be helpful. Place the head and neck in a neutral or relaxed position. Insert your tube into the nostril (the larger nostril, the better) with the tube toward the nasal floor. Gently advance the tube while medially rotating it 15 to 30· until maximum airflow is heard. Advance the tube during the first part of inspiration (when the vocal cords are opened). Auscultate the epigastrum for proper placement. Inflate the cuff and secure the tube in place.
Nasotracheal intubations may also be performed visually with the aid of a laryngoscope and Magill forceps. Insert the tube nasally using the same procedure. As the nasal tube is passed through the nasal cavity to into the pharynx, lift up the epiglottis with a laryngoscope. Using Magill forceps, grasp the tube and advance it through the vocal cords. Verify placement, inflate the cuff, reverify placement, and secure the tube.
Advantages
· Tube placement can be performed with the patient's head and neck immobilized.
· Nasal intubation is more comfortable than oral intubation.
· The tube cannot be bitten.
· The tube is easily anchored.
Disadvantages
· This procedure is more difficult and time consuming than oral intubations.
· It is more traumatic for patients (lacerations of the pharyngeal mucosa and larynx).
· The tube has more potential to kink and clog.
· It poses a greater risk of infection.
· Improper placement is more likely.
· Patient must be breathing to perform "blind" insertion.
Contraindications
· Patients with nasal and basilar skull fractures.
· Patients with a deviated septum.
· Patients experiencing nasal obstruction.
LIGHTED STYLETS
With the advancement of fiberoptic technology, lighted stylets have been developed. The lighted stylet is a malleable wand which is inserted into the ET tube just like a regular stylet. However, this stylet has a high-intensity light at its tip. In a darkened location, you will be able to see placement of the tube/stylet by the glow of the light through the patient's skin. This technique is useful because the head and neck of the patient need not be manipulated.
To perform this procedure, continue ventilatory support while checking your equipment. Hyperventilate the patent for two minutes with 100 % O2. Kneel at the patient's side, facing him/her. Turn on the stylet. Place your index and middle fingers deeply into the patient's mouth with your thumb on their chin. Lift the patient's tongue and jaw forward. Place the tube/stylet into the mouth using a hooking motion to lift the epiglottis aside. Advance the tube/stylet until you see a circle of light at the patient's thyroid cartilage. At this point, hold the stylet stationary while advancing the tube 0.5 to 1 inch. Remove the stylet, attach a BVM to the adapter and check for proper placement of the tube (auscultation, breath sounds, chest rise, capnography). If the tube is in proper place, inflate the cuff. Once again, check proper placement and secure the tube. If the tube/stylet exhibited a dim light, the tube may be in the esophagus. To correct this problem, withdraw the tube completely; hyperventilate the patient for at least two minutes, and try again.
Advantages
· Manipulation of the head and neck is minimal (Trauma patients).
· Lighted stylets can be used to verify intubations accomplished via other techniques
Disadvantages
· Ambient light can make visualization difficult.
· Lighted stylets are too large for pediatric patients (6 mm diameter).
DIGITAL INTUBATION
Digital intubation is not as common of a procedure today due to the invention of the laryngoscope. However, there are some instances when intubations must be performed this way.
Position yourself at the patient's left side. Assemble and prepare your equipment. Hyperventilate the patient for a minimum of two minutes with oxygen. Place some sort of bite block in the patient's mouth to keep it open and prevent the patient from biting your fingers. Place your left index and middle fingers into the patient's mouth. Work your way down the throat pulling the tongue and epiglottis away from the glottic opening. Work your way until you can feel the epiglottis. It will feel like a mucous-covered flap. Guide your ET tube with your right hand along your left index finger. Lead the tip of tube into the glottic opening. Verify tube placement, inflate the cuff, reverify placement, and secure the tube.
Advantages
· Manipulation of the head and neck is minimal (Trauma patients).
Disadvantages
· Trauma may occur during intubation.
· Due to lack of visualization, the tube placement may be incorrect.
· Rescuer may be bitten.
SURGICAL AIRWAYS
There are some instances when nasal and oral intubation cannot be effectively utilized. Such cases are an upper airway obstruction which cannot be relieved by conventional methods, laryngospasm, or such trauma where oral and/or nasal intubation is impossible. Needle cricothyrotomy and transtracheal jet ventilation may be your last resort.
NEEDLE CRICOTHYROTOMY
Cricothyrotomy allows you to rapidly penetrate a patient's airway by puncturing the cricothyroid membrane and creating an airway tube for temporary oxygenation and ventilation. The equipment that will be needed is a 12 to 14 gauge over-the-needle catheter (18 to 20 gauge for children), a 5 to 10 mL syringe, alcohol or iodine swabs, tape or ties, pressure-regulating valve and pressure gauge with a high pressure oxygen supply, high pressure tubing and regulator, and a release valve.
With the patient supine, find the cricothyroid membrane (membrane below the thyroid cartilage). Hold the larynx using the thumb and middle finger of one hand while doing so. Insert the needle of the syringe downward at a 45 degree angle, through the midline toward the chest. Maintain negative pressure on the syringe while advancing it. When the needle is in the trachea, air will fill the syringe. If you get blood in the syringe, reposition the needle. Advance the catheter over the needle toward the chest and remove the syringe. Be careful not to bend the catheter while doing this. Hold the catheter hub while attaching a pediatric endotracheal tube adapter. Check for adequate ventilations by looking for the rise and fall of the chest, and breath sounds. (Remember that you are trying to ventilate through a very small hole. You must squeeze the bag VERY slowly in order to deliver the appropriate volume. If you don't, the pressure within the catheter will prevent the adequate flow of air.) Once ventilation has been verified, begin ventilating with a transtracheal jet ventilator.
Remove the pedi ET tube adapter. Connect flexible tubing to the end of the hub of the cannula to the oxygen regulator. (Do not use a demand-valve device for the delivery of oxygen as it will not provide enough tidal volume through a needle of this size to be effective.) Be sure to provide a release valve. This may be done with a Y or T connector, through a three-way stop cock directly attached to the high-pressure tubing. This may also be done by cutting a hole in the oxygen line proving a "whistle-stop" effect.
When the release valve is closed, oxygen goes into the trachea. Adjust the pressure to allow adequate lung expansion. Lung expansion can be visualized. At this point, open the release valve to allow exhalation. This will be a passive process. A breath rate rate of 20 breaths per minute should be delivered. Secure the catheter hub to the skin while continuing ventilations.
Complications
· Hemorrhage at the insertion site.
· Subcutaneous or mediastinal emphysema due to inaccurate placement of the cannula into the subcutaneous tissues instead of the trachea.
· May perforate the esophagus if the needle is inserted too deeply.
Disadvantages of Transtracheal Jet Ventilations
· Due to the high pressures in ventilation, pneumothorax may develop.
· Does not allow for suctioning.
· May not provide adequate elimination of CO2.
CRICOTHYROTOMY
Cricothyrotomy, like the two above techniques, should not be performed on patients who can be orally or nasally intubated.
In patients with suspected cervical spine injuries, maintain spinal stabilization during this procedure. Clean the neck with alcohol or iodine prep pads. Locate the cricothyroid membrane. With a scalpel, make a 2 cm incision through the membrane. Check your protocol as to whether the incision should be vertical or horizontal. Open the cricothyroid membrane by inserting the scalpel handle into the membrane and rotating it. Insert a 6.0 or 7.0 ET tube into the larynx. Inflate the cuff and secure the the tube. Ventilate with a BVM that is hooked up to an oxygen supply. Determine adequacy of the ventilations by auscultation and observation of the chest. Do not attempt removal of this adjunct in a prehospital setting.
Complications
· Hemorrhage.
· Aspiration.
· Possible misplacement and false passage of the tube.
· Perforation of the underlying esophagus.
· Vocal cord, carotid and jugular vessel injury lateral to the incision.
· Subcutaneous emphysema.
Contraindication
· Acute laryngeal disease caused by trauma or infection.
A patent airway is extremely important to maintain. It is often challenging and taxing to accomplish. Without adequate perfusion, your patient can suffer irreversible and terminal damage. Remember to monitor the patient often and check your interventions to ensure they are working adequately. Your quick thinking and efforts can have a direct effect on the patient's survival.
Try our Advanced Airway Quiz on the RAEMS Blog (here)